
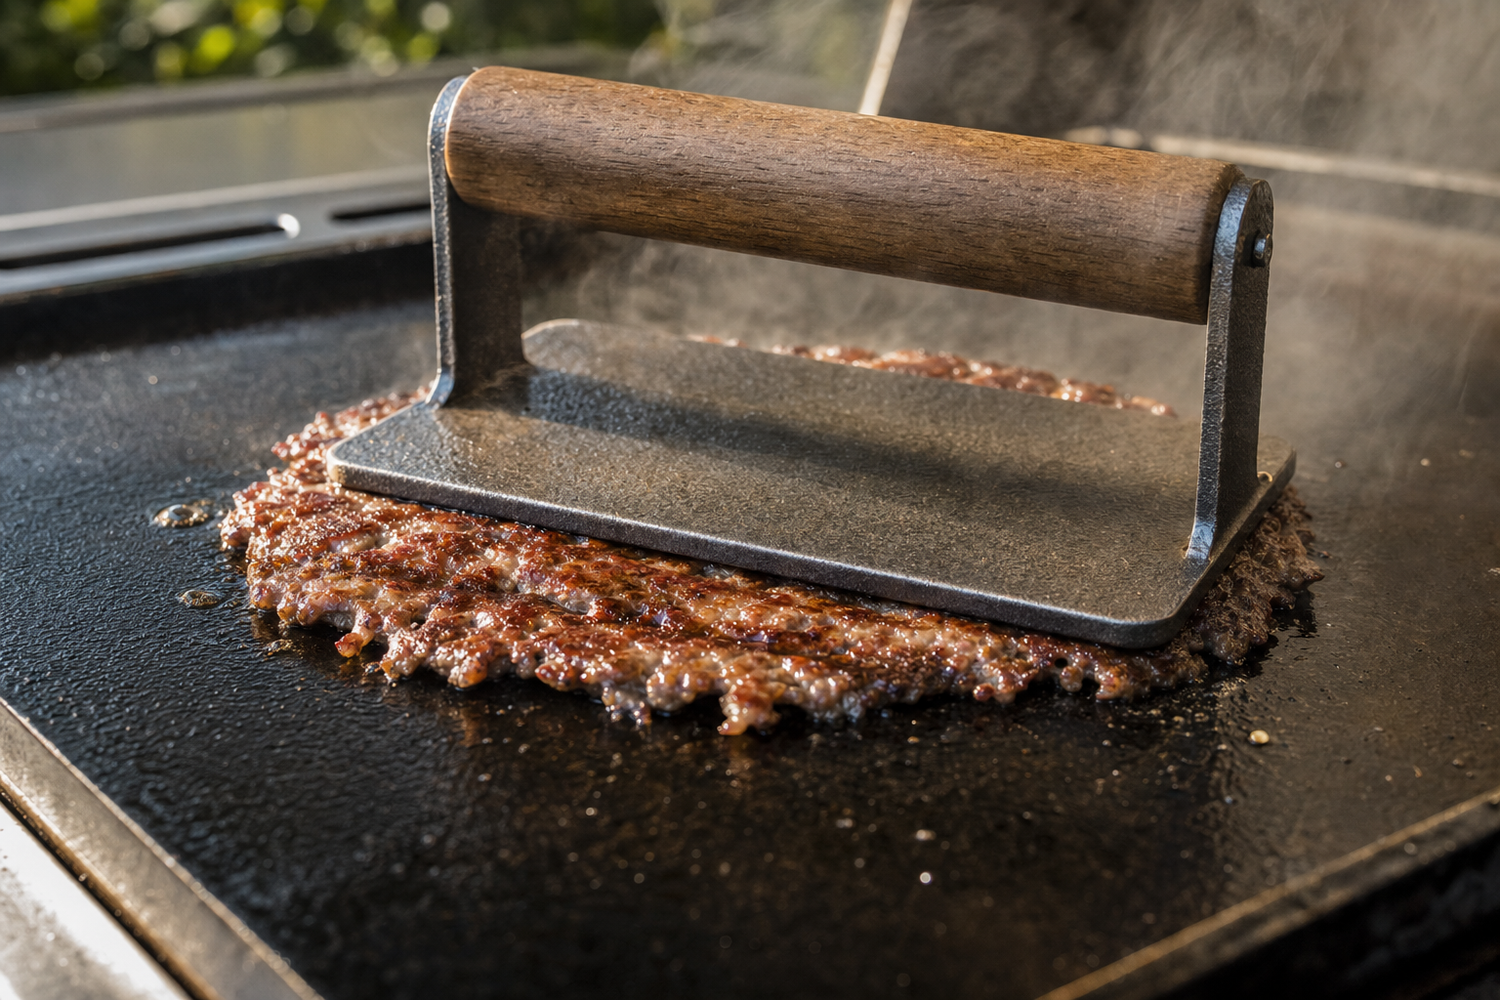
Thicker is better -- that is the burger orthodoxy most backyard cooks grew up with. Half-pound patties, thumb-pressed dimples in the center, careful temperature management so you don't dry out the center before the outside chars. The smash burger breaks every one of those rules, and it produces a better result. Understanding why requires a brief visit to protein chemistry, but the payoff is a technique that works consistently on a standard backyard grill.

The Maillard Reaction and Why Surface Area Matters
The flavor in a seared burger does not come from the interior. It comes from the Maillard reaction -- the chemical process that occurs when amino acids and reducing sugars are exposed to high heat, typically above 280°F (138°C) on the surface. The Maillard reaction produces hundreds of flavor compounds that create the crust, the aroma, and the savory depth that makes a burger taste like a burger rather than a meatloaf.
The limiting factor for the Maillard reaction is contact. A thick, rounded patty touches the grill surface only at the highest points of its curve. The majority of the surface is elevated above the grate, in the convective heat zone rather than the conductive contact zone. Conductive heat transfer -- direct metal-to-meat contact -- is orders of magnitude more efficient than convective heat transfer. The thick patty spends most of its cooking time being heated by air rather than by metal, which is why you have to cook it longer to reach safe internal temperature, and why the crust development is inconsistent.
Smashing the patty flat immediately after it hits the cooking surface solves this problem. Maximum contact area means maximum Maillard reaction, faster crust development, and more flavor per square inch of burger.
Why Smash Burgers Require a Flat Surface
The technique requires a flat, solid cooking surface -- a griddle, a cast iron plancha, or a flat-top insert. Standard grill grates will not work for smash burgers because the meat will extrude through the gaps when pressed. The grate geometry also prevents the flat-contact crust from forming evenly; instead of a solid sear surface, you get grill marks with raw or steamed meat between them.
A cast iron griddle placed over your grill grates solves this problem. Lodge Cast Iron's guide on using cast iron over a grill confirms that cast iron griddles work well on gas and charcoal grills when properly preheated. The griddle needs to reach 400-450°F before cooking begins -- use an infrared thermometer to verify surface temperature. Too cool and the smash will steam rather than sear. Too hot and the exterior will char before the interior reaches safe temperature.
Beef Selection and Fat Content
The fat content of the beef matters more for smash burgers than for thick patties. You want 80/20 ground beef -- 80% lean, 20% fat. The smashing process presses fat toward the edges of the patty, where it contacts the hot cooking surface directly and produces the crispy, lacy edge that defines a well-executed smash burger. Leaner beef produces a drier patty with less of the edge texture that makes the technique worthwhile.
Portion size is typically 2-3 ounces per patty. Most smash burger recipes use two patties per sandwich, for a total of 4-6 ounces of beef. This is substantially less beef than a traditional backyard burger, but the crust-to-interior ratio is much higher, which means more Maillard reaction flavor per bite.
Form the beef into loose balls immediately before cooking. Do not pack or compress the meat when forming -- the loose structure allows the fat and juices to move freely when smashed, contributing to the edge texture. Do not season before smashing; salt draws moisture to the surface, which inhibits the initial sear. Season immediately after smashing, while the crust is forming.
The Smash Technique
Place the beef ball on the hot griddle. Immediately press it flat with a heavy, flat metal spatula. Apply firm, even pressure for 10-15 seconds. The patty should be approximately 1/4 inch thick -- thinner than you think is reasonable. Season immediately with salt and pepper.
Do not move the patty after smashing. Leave it undisturbed until the edges show gray-brown color progressing inward from the perimeter -- typically 1.5 to 2 minutes on a properly preheated surface. This visual cue indicates that the Maillard reaction has completed on the contact surface and the patty is ready to flip.
Flip once. Add cheese immediately after flipping if you want a cheese smash. The residual heat from the cooked side will melt the cheese in 30-45 seconds. Total cook time after flipping is typically 45-60 seconds for a 2-3 ounce patty. The patty is thin enough that internal temperature reaches safe levels quickly after the flip.
Griddle Temperature Management on a Backyard Grill
The challenge with a backyard grill is maintaining griddle temperature across multiple patty batches. Each batch of cold beef cools the griddle surface. On a commercial flat-top, the burners compensate automatically. On a home grill, you need to manage this manually.
Run the grill at high heat with the lid closed for 10-15 minutes with the cast iron griddle in place. Verify surface temperature before cooking. Cook in batches of 2-4 patties depending on griddle size. Between batches, close the grill lid for 60-90 seconds to allow the griddle to recover temperature. Open, verify temperature with the infrared thermometer, then cook the next batch.
Resist the temptation to cook too many patties simultaneously. A crowded griddle drops surface temperature and turns a sear session into a steam session. Better to cook in smaller batches with temperature recovery between rounds.
Bun and Assembly Considerations
The smash burger requires a specific bun type to work properly. Thick, artisan buns overwhelm the thin patties and shift the texture ratio away from crust. Martin's potato rolls, brioche slider buns, or standard soft burger buns work best. The bun should be toasted on the griddle surface -- the residual fat from the patties provides enough lubrication for a quick toast without adding butter.
The double-patty construction is standard: two smashed patties with cheese between them creates a unit with enough structural presence to eat as a sandwich while maintaining the high crust-to-interior ratio that defines the technique. Classic condiments -- American cheese, diced white onion cooked on the griddle alongside the patty, pickles, yellow mustard, and ketchup -- complement the Maillard flavor profile without competing with it.
Common Mistakes
Smashing too late. The smash needs to happen within the first few seconds of the beef hitting the griddle, before the exterior proteins begin to set. If you wait 30 seconds, the protein matrix has started to firm and you will not achieve maximum contact area. The smash has to be immediate.
Not pressing firmly enough. A tentative press produces a patty that is still too thick in the center. Apply firm, sustained pressure for the full 10-15 seconds. Use a spatula with enough surface area to cover the patty and a handle sturdy enough to take the force without flexing.
Moving the patty before the crust releases. A properly seared smash burger will release from the griddle cleanly when the crust has formed. If you try to slide the spatula under it early, the crust tears and stays on the griddle. Wait for the visual cue at the edges.
Using a griddle that is not hot enough. A surface temperature below 375°F will produce a steamed patty rather than a seared one. The moisture from the beef cannot evaporate fast enough at lower temperatures, and the steam prevents the Maillard reaction from initiating. Preheat longer and verify with an infrared thermometer before you put the first ball of beef down.
The smash burger is a legitimate technique with a sound basis in food chemistry. The rules it breaks -- thin patties, maximum contact, no resting period before flip -- are not shortcuts. They are the mechanism by which the technique works. Master the griddle temperature, the timing, and the single flip, and the backyard smash burger is a consistent, repeatable result.
Once you've dialed in the technique, it's worth putting the same attention on the grill itself. Grillacoat protects the non-cooking exterior surfaces -- lid, hood, panels, and hardware -- so the grill holding your cast iron griddle stays in the same condition as the cook you just pulled off.